Getting the highest-quality in-app traffic without wasting a single cent is every media buyer’s dream. With the right approach to building blacklists and whitelists, you can minimize spending on irrelevant traffic.
The problem is that many media buyers try to cut costs so aggressively that they disrupt the algorithms, making it difficult to launch and scale campaigns properly. With in-app networks, especially Unity Ads, rushing the process can end up costing twice as much.
In this article, the experts at RentAcc explain how to set up blacklists and whitelists using Unity Ads as an example. We’ll also cover common mistakes that prevent media buyers from reaching profitability.
What Are Blacklists and Whitelists in Unity Ads, and Why Do You Need Them?
Blacklists and whitelists are traffic filtering mechanisms designed to restrict the pool of advertising placements.
| Blacklist | Whitelist |
|---|---|
| A list of apps where ads fail to deliver the desired results. Creatives are shown in all apps except those included in the Blacklist. | A list of apps where ads deliver the best results in terms of traffic quality and cost. Creatives are shown only in the apps included in the Whitelist. |
In Unity Ads, these filtering mechanisms have different names, but the principle remains the same:
- Blacklist — Blocklist
- Whitelist — Allowlist
To add an app to a Blocklist or Allowlist, you simply need to specify its Source App ID. You can’t use one list for every campaign type: a separate list must be created for each GEO, operating system (Android or iOS), and campaign type (CPI, Payer, or ROAS).
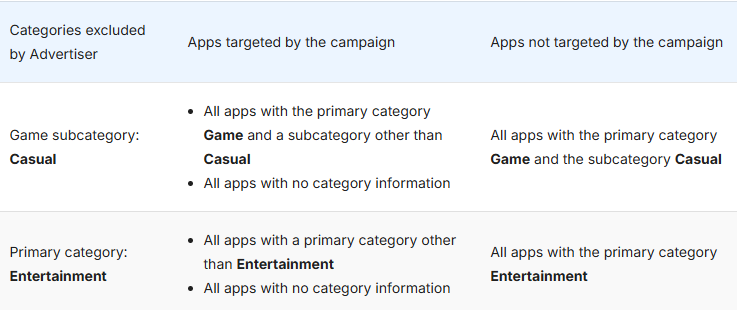
In addition to individual apps, you can configure lists by category. For example, you can show ads in Puzzle games while excluding Arcade games. You can also use both approaches simultaneously.
4 Tips for Setting Up Blacklists and Whitelists in Unity Ads
At first glance, the secret to profitability on Unity Ads seems obvious: disable most placements and get highly targeted traffic. In practice, this strategy often leads to results that fall short of expectations.
Start with the Broadest Possible Targeting and No Blacklists
Unity Ads’ ad delivery engine needs room to learn which audience segments to target.
Starting with narrow targeting and an extensive blacklist means shooting yourself in the foot. This strategy restricts the algorithm: with too little data, the pool of potential users becomes too small, and the campaign won’t get enough traffic or, consequently, enough target actions. This is likely to hurt campaign performance. To avoid this, we recommend the following approach:
- Start with the broadest possible targeting.
- Analyze results as data accumulates.
- Gradually narrow your targeting and filter out underperforming apps.
There’s another important detail to keep in mind. Unity Ads is known for its slow ramp-up. If an app doesn’t show positive momentum within the first 24 hours after launch, it’s too early to add it to the blacklist. The platform’s algorithms need approximately 5–7 days to collect initial performance data.
If you rush to build a blacklist and narrow your targeting, the outcome will be the same: the algorithm won’t have enough room to learn, and you may also miss out on potentially valuable apps. The same applies to categories — we don’t recommend blocking more than 2–3 categories. Otherwise, traffic delivery may stop altogether.

The only scenario in which it makes sense to start with narrow targeting and a blacklist is when you already have accumulated data from specific launches, GEOs, operating systems, and campaign types.
Don’t Start with Bids That Are Too Low
Unity Ads is not Facebook, and small $50 micro-tests don’t work here. By trying to save money at launch, media buyers once again take away the room the algorithms need to learn. To collect enough data, you need to spend 1.5 times the CPA bid on a single placement. In approximate figures, the benchmarks are as follows:
- $200–250: for Tier-2 and Tier-3 countries;
- $300–350: for Tier-1 countries.
It’s also advisable to start with a higher budget and bid. This helps you outbid competitors and win more auctions.
Keep in mind that this budget is only enough to launch one campaign targeting a single GEO and operating system. Ideally, allocate 1.5 times the CPA per placement to collect the necessary data. Larger teams with substantial budgets can allocate 2 times the CPA to evaluate a placement’s performance and decide whether to add it to the Blocklist or Allowlist.
Example: A large team is running traffic for a gaming offer with a CPA rate of $10. To collect as much performance data as possible, it allocates $20 per target action.
You can increase or decrease the bid later, depending on campaign performance.
Evaluate the Quality of Traffic from Each Placement
Unity Ads is undoubtedly a budget-dependent platform. If you start with a reasonable budget or even increase your bids but still don’t see quality traffic, the app is likely the problem — provided that your creatives, product, and overall setup are all in good shape. The app itself also plays a decisive role: its design, file size, webview loading speed, number of downloads, and attribution setup all matter.
Review and Update Blacklists Regularly
To avoid losing valuable traffic, you need to review your blacklists periodically. An app that seemed dead and was added to the Blocklist two weeks ago might suddenly become active again and start generating delayed conversions. We recommend reviewing your lists every two weeks.
Periodically check the data from excluded apps and update your blacklists accordingly.
How to Run Campaigns Using Allowlists
Blacklists are straightforward: underperforming apps are excluded to avoid wasting budget. To maximize traffic quality, you can build an Allowlist. Experts recommend adding apps that have generated around 40–50 installs.
If you’ve already built a substantial list of high-performing apps, don’t rush to impose strict limits. Instead, run the following campaigns in parallel:
- Standard campaigns: with an active Blocklist or without one;
- Campaigns with an active Allowlist.
In this setup, standard campaigns act as detectives, gathering data on high-performing apps.
If you decide to use Allowlists, keep in mind that your budget and bid should be higher than the average for the GEO to achieve the best results. Otherwise, it will be difficult to outbid competitors, and your campaign may struggle to win impressions. However, launching a campaign with these settings across broad targeting can burn through your budget quickly, with no guarantee of profitability.
It’s worth noting that Allowlists are not suitable for every campaign type. For example, with install-optimized campaigns, you can manage bids in detail by uploading a list of Source App IDs and setting a bid for each app.
ROAS campaigns are much more challenging because the narrow range of placements makes it difficult for the algorithms to learn consistently. This can negatively affect budget delivery.
Conclusion
Blacklists and whitelists are excellent tools for filtering traffic. They’re only beneficial when media buyers understand the specifics of Unity Ads, the GEO they’re targeting, and their audience’s needs. If creatives are weak, the setup is burned out, and there’s no patience, no budget or blacklist/whitelist can save the campaign from poor results.
The RentAcc team advises clients on the technical and practical aspects of launching campaigns. We also provide trusted agency accounts with a credit line and whitelisting for iGaming campaigns. Contact our support team to ask questions and get access to an account. You can discuss the terms of cooperation with our managers or find out more on our website.
 Share this post